Beginner guide
Start as Experiment, keep a working light accessible, and turn foliage into a bag before collecting everything you see. Prepare drinking water, bleeding supplies and a place to rest before descending. The route below separates current item and mechanics pages from older beginner-guide advice.
1. Choose a run and learn what changes
Begin with Experiment if this is your first run. The current playable-character comparison lists Experiment as available immediately, Milky after finishing a run as Experiment, and Dune after finishing one as Milky. That makes Experiment the useful baseline for learning: advice about eating fruit, sleeping on ordinary ground and reading objects is not automatically transferable to Dune. The character pages describe different diets, sleep cycles and learning rates, rather than three cosmetic skins.
Open the run settings before committing to a descent. The community Difficulty page separates starting supplies, ambient light, layer time limit, healing, metabolism and other modifiers. An easier preset changes the resources and pressures you are practicing under; it does not make darkness, wounds or inventory management irrelevant. Choose one preset for several attempts so you can connect a changed decision with its consequence. Change fewer settings at once when you start experimenting.
Use the built-in training courses for basic interactions. Experiment is the character the current comparison lists as able to take them. Your first useful goal is modest: leave the first area with a functioning light, storage, drink and accessible wound supplies. A run that teaches you how to recognize a trap or manage a bleed has already given you information for the next attempt. The characters guide explains later unlocks without mixing their special rules into this starting route.
2. Practice controls before moving into darkness
The community getting-started guide maps movement to WASD, jumping to Space, crouching or descending a rope to S, and ragdolling to X. Its item controls include T to throw, Q to switch hands and F to favorite an item; C opens crafting. Read your own bindings in Settings when a prompt differs. The source guide explicitly carries an age warning, so the table records these as community bindings rather than claiming a new official control manual.
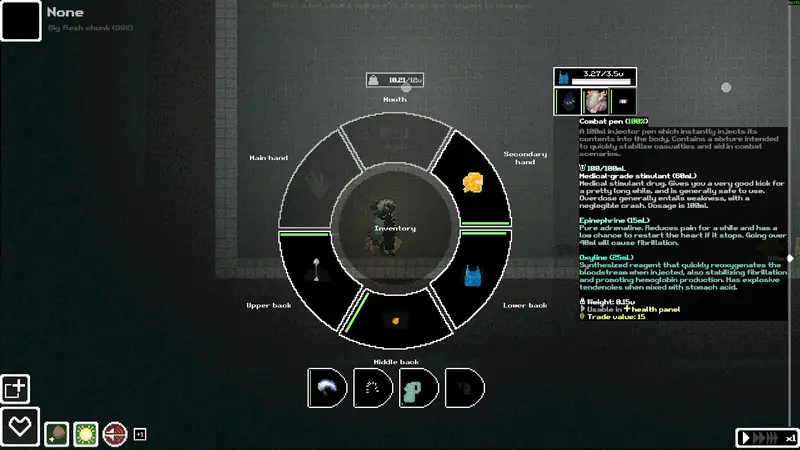
Practice moving, swapping hands and opening your bags while you are still beside the starting pod. Put an unimportant object in a hand, move it between slots and confirm which interaction uses it. This prevents an emergency from becoming your first lesson in where an item went. Give a light, dressing and drinking container recognizable places instead of letting every newly found object change the arrangement.
Treat throwing as a separate action from discarding an item into storage. Inspect the landing area first and use expendable objects when probing a hazard. Favoriting useful equipment is especially valuable when that equipment can also satisfy a crafting ingredient. The beginner source recommends favoriting the foliage bag for precisely that reason. Familiarity with a small set of repeated actions is more useful than memorizing every advanced key before you can reliably find the supplies already in your inventory.
| Key | Action | Evidence status |
|---|---|---|
| WASD | Move / climb | 1 source · community wiki |
| Space | Jump | 1 source · community wiki |
| S | Crouch / climb down | 1 source · community wiki |
| X | Ragdoll | 1 source · community wiki |
| C | Crafting | 1 source · community wiki |
| T | Throw | 1 source · community wiki |
| Q | Swap hands | 1 source · community wiki |
| F | Favorite | 1 source · community wiki |
3. Make light part of your route
The Emergency light item page describes a small directional beam and a battery that cannot be replaced. It lists ten minutes of active use; that is an item-page value from one community source, not a guarantee about the duration of an entire run. The same page says an illuminated light continues to lose charge inside a container even though its beam is hidden there. Switch it off before storing it rather than treating a bag as an off switch.
When held, the beam follows the cursor. Use that to inspect the ground below you and the opposite side of a gap before moving. A visible exit is a better next step than an unexplored drop that might contain a trap. Reserve enough illumination to inspect the place where you expect to rest, craft or treat an injury; running out just as you enter unfamiliar terrain turns several manageable tasks into one problem.
The older starting guide recommends glowplant fruit as a temporary backup and says the character has a small amount of innate light. Neither is a reason to charge into a large dark space. Pick a replacement light when the opportunity appears, and distinguish a light you can activate from one stored away as spare equipment. The items index lets you compare equipment without turning this first-run route into a shopping list of every possible lighting device.
4. Craft storage before hoarding materials
The basic foliage-bag chain in the public guide is one rope plus two canvases. Rope uses two foliage and each canvas uses three, so the listed chain requires eight foliage in total when starting from raw materials. That total is arithmetic from the recipe, not a second source for it. Collect foliage from the plants you can safely reach, and turn it into the components as you go rather than waiting until loose resources fill the available space.
Open crafting with C and select the bag recipe to see its ingredients. The Crafting page says materials can be on the ground nearby if no tiles block access; they do not all need to fit in your inventory. This lets you organize a small work area instead of repeatedly abandoning the craft to reshuffle everything. Check the ingredient list before clicking the output, especially when an existing bag could itself be accepted by another recipe.
After crafting the bag, move suitable objects into it and favorite equipment you intend to keep. A container has its own capacity and per-item weight limit, so a spare slot does not prove an object will fit. Make a second container when you have a clear use for it, such as separating immediate first aid from crafting stock. Storage is useful because it makes the next decision easier; filling every new container immediately defeats that purpose.
5. Read recipe difficulty instead of forcing a craft
The current Crafting page ties recipes to Intelligence. Green means the requirement is met. Yellow, orange and red mean you are short by one, two or three INT levels, and the page assigns a failure chance to each of those attempts. It describes increasingly serious consequences: reduced output condition, no output, then damage and pain to the hands. Recipes farther above your INT may not appear at all. A missing entry can therefore mean a skill requirement rather than a missing installation.
For a beginner, use a green recipe for equipment you need immediately and save experiments for a safe place with spare materials. That is a planning recommendation, not a hidden game bonus. Damaging both hands while you still need to escape, dig or bandage yourself compounds the risk of a failed craft. If the recipe needs ingredients you cannot replace, compare another route to the same goal, such as finding or trading for the finished item.
The wiki marks first-time recipes with a green plus and says they grant mood and INT experience. The same bonus is not a reason to repeat an already completed recipe indefinitely. Pin the recipe you are currently pursuing so you can recognize useful loot while exploring. The crafting table carries ingredients and named recipes; this guide concentrates on deciding when to attempt them and how to avoid consuming the resources needed for your immediate survival.
6. Solve encumbrance before it becomes immobility
Encumbrance is carried load relative to carrying capacity, not the character’s body mass. The current Encumbrance page lists both an item weight and container-specific values such as capacity, maximum weight per item and encumbrance reduction. Read the inventory’s total alongside those properties. Moving an object into a suitable bag can change its contribution to the load, while putting it into an unsuitable bag may simply fail.
The page describes progressively worse mobility and stamina as excess load rises, with complete immobility at its maximum. React when movement first becomes cumbersome. Stop in a place you can see, put duplicate or low-priority materials down, and check the difference before moving on. Keep drinking water, working light and immediate wound supplies in the first group you preserve. An unidentified heavy object is a poor reason to lose the ability to leave a dangerous area.
The wiki also describes passive skill gains from moving while overburdened. Treat that as a mechanic explanation, not a beginner objective. A first descent already asks you to learn movement and recognize hazards; deliberately reducing your escape options adds a variable you do not need. Revisit exercise and training after you can manage the basic route comfortably. Keeping one spare capacity margin also makes it easier to pick up a genuinely useful replacement without reorganizing everything beside an active threat.
7. Climb and descend with a visible landing
The current playable-character page gives shared movement abilities: wall jumping, wall sliding and a jump height of 6.5 tiles. It also describes roughly twenty tiles of horizontal reach, while collision sizes differ among characters. These are community measurements. Do not treat maximum reach as a safe target when your present load, footing or condition already makes movement awkward. A route with a visible intermediate landing gives you a chance to recover from an imperfect jump.
Use an available vine or ladder to control a descent instead of relying on a long fall. The older control list associates upward movement with grabbing and climbing, and S with climbing down. Move deliberately until you recognize the attachment and release behavior. Wall sliding can slow a fall, but it cannot tell you whether the landing contains a spike, creature or dangerous liquid. Illuminate the destination first.
Crouching reduces the space needed to pass through terrain. The character comparison says all three bodies fit crouched through three-tile gaps, while it describes ragdoll crawling through smaller openings. Practice these actions on a safe route before depending on them during pursuit. Digging another passage may be preferable to a blind drop, but check the stamina and time cost. The useful question is whether you can still retreat, rest and treat an injury after taking this route, not whether the character can technically fit through it.
8. Separate clean drinking water from other liquids
Groundwater is drinkable in the current item entry, but it carries sickness and mood penalties. That is more precise than the absolute claim that the game forbids drinking it. The same source describes clean-water crafting and says a filter straw in the main hand prevents the listed negative effects while drinking groundwater. For an ordinary beginner route, prepare clean drinking water when you can and keep the supply easy to identify.
The starting guide lists a canteen recipe using two chunks of plastic, one rope and ten millilitres of bio-chem fluid. Look up the current recipe when planning that craft. Its advice also warns that an exposed fluid container can collect world liquids through contact, creating an inconvenient mixture. Store your drinking container deliberately and inspect its contents after crossing liquid rather than assuming the old name still describes everything inside.
Drink management is a preparation task. Fill and organize supplies before descending into an unfamiliar section, then choose the next refill opportunity while you still have options. Food that grants some hydration and groundwater that can be processed are different resources; neither should silently become “clean water” in your inventory plan. If you have to use an imperfect drink during a run, watch the resulting symptoms instead of repeatedly consuming it without checking what changed. The medicine guide separates hydration problems from unrelated conditions that can look similar.
9. Carry food for needs, not just for mood
The Food & Drink table separates hunger, thirst, mood, sickness, weight and decay. A snack that raises mood may provide little nourishment, and a food that fills hunger may reduce hydration. Read those as different effects. The table’s solid-food values are per bite, whereas its main liquid table uses one hundred millilitres. Comparing the printed numbers without their units can lead you to overvalue one item.
Keep a practical mix rather than filling your bags with every edible object. Use fast-spoiling food when it solves a present need and preserve compact supplies for the stretch between safe stops. The wiki lists nutrient bars and some other foods without decay, while fruit entries vary substantially. Check the item you actually have; a general rule about all fruit or all packaged food is less useful than its own condition and effects.
Character diet matters. The current playable-character comparison says Milky gets less nutrition from meat and becomes sick from it; Dune has a carnivorous diet and different sickness rules. This guide starts with Experiment so those exceptions do not turn into universal recommendations. Chocolate and other foods should also be read alongside the character’s listed quirks. When hunger, thirst and mood all need attention, choose which problem is urgent and which item addresses it. Eating several unidentified things at once makes the next symptom harder to interpret.
10. Sleep before exhaustion removes your options
Energy has its own display beside the Zzz icon in the health panel. The current Energy page says ordinary sleep is available below thirty-five percent energy when total pain is below thirty-one percent and sickness below eighty percent. It also lists run settings and items that change restrictions. Those thresholds belong to the community mechanics page; a disabled button is a prompt to inspect your condition and settings, not proof the sleep action is broken.
Prepare the resting place while you can still move reliably. Inspect the ground, nearby threats and supplies, then use the health-panel sleep control. Sleep quality depends on the surface, and the Life-pod page identifies its rubber flooring as useful for rest. The Energy page also warns that held items drop when sleep begins. Organize equipment and fluid containers before initiating sleep so waking does not start with a search for something you were carrying.
Sleeping pills and naptail can bypass ordinary restrictions according to the wiki, but its Energy entry warns against mixing them with opiates. A new player should not turn an unclear medicine combination into the default sleep method. Pain, sickness, temperature and other needs can wake the character; sleeping is not a substitute for resolving the condition that repeatedly interrupts it. Milky’s cycle is much faster than Experiment’s, so revisit the Milky page when you unlock that character instead of expecting this baseline schedule to carry over.
11. Notice mood changes while you can still act
Mood is a separate resource from energy. The Mood page describes a range from negative one hundred to positive one hundred, with increasingly serious movement and item-use problems at low values. Its icon names include Satisfied, Excited, Happy and Gleeful on the positive side. “Really happy” searches refer to that progression rather than a separate system you need to unlock. Use the moodles index to connect the icon you see with the underlying need.
A useful beginner habit is to read mood after a bad encounter, an injury and a meal. If it changed, inspect pain, food effects and what happened nearby before consuming another item. The older getting-started guide describes noticing corpses even through walls; its precise distance is not needed to make the practical decision to move away from a distressing area. Do not assume turning the character around removes an environmental trigger.
High mood is associated with Last Stand, but the current Mood page describes a delayed sample of earlier mood in that calculation. Raising it at the last moment is therefore not a simple guaranteed rescue. This guide recommends stable needs and manageable injuries because those improve your immediate ability to act. Treat a later Last Stand as a separate mechanic, explained on the Last Stand page, and keep console commands on the commands page so ordinary survival advice does not depend on using cheats.
12. Read the health panel before choosing treatment
After an accident, distinguish an ongoing threat from the injury it caused. Reach a place where you are not repeatedly taking damage, then inspect the health panel and affected limb. The current Bleeding entry explains that overall blood loss includes external and internal bleeding, with regeneration affecting the displayed total. A declining blood supply without an obvious external wound is therefore a reason to inspect further, rather than endlessly applying the same dressing.
The First-Aid Guide organizes supplies by bleeding, pain, internal bleeding and infection. Keep immediate supplies in a predictable bag and recovery supplies in another area if that helps you find them. Its suggested order emphasizes making urgent treatment possible, controlling major bleeding and getting to safety. Read the actual item’s use and the limb you are applying it to. A medicine name alone does not show whether it treats a cause, a symptom or a different condition.
Check again after treatment. Look for a changed blood-loss indicator, pain level and limb condition before assuming success. The Infection page separates wound infection from simple skin damage, and the first-aid notes describe an early “weird feeling” complaint that can precede a clear icon. Cleanliness and follow-up matter after the immediate emergency. All drugs discussed here are in-game items. Detailed indications, warnings and source counts belong on medicine and the linked item pages; this starting route deliberately avoids handing a new player an unexplained dose table.
13. Use pods, traders and locks deliberately
A life-pod can be a useful stop rather than just another loot container. Its current page describes temperature controls and a one-use shower, along with a survivor or life-pod chest. Inspect which facilities remain available before deciding whether to rest there. Keep the return route visible, and avoid damaging useful equipment merely because it can be broken for a component.
Lockpicking has a current-version distinction worth keeping. The lock-picking kit description says it can be anywhere in inventory, matching the release-note change that removed the need to keep it in a main slot. A lower Usage paragraph on that same wiki page still says one of six main slots. Those are conflicting instructions within one source, not two independent confirmations. Follow the newer release behavior and check the kit’s INT requirement and remaining condition if it is not being used.
The Skills page lists reading, first-time crafting and trading among ways to improve Intelligence. Treat a trader as a chance to replace a missing practical supply, not as a requirement to buy everything. Compare a purchase with the need it solves: a drink, a light replacement or a treatment you understand may be more useful than an unfamiliar expensive object. Experiment can read materials and haggle; later characters have exceptions. Keep the mods installation guide separate from this route so troubleshooting a modified inventory is not confused with learning the base game.
14. Leave layer one with a repeatable plan
The current Layers table names the first layer Gravel Lands and lists shade crawlers, spike traps, jump pads and geysers there. The older starting guide’s claim that the game has five layers is historical; the full-release publisher describes eleven underground layers. Use the layers guide for present progression and its explicitly preserved counting difference with the wiki, rather than carrying an old demo limit into your route.
Before descending, review four practical questions: can you see the landing, carry your current load, drink safely and reach your wound supplies? Add a sleep check if energy is already dropping. This is a suggested preparation routine, not an unlock condition. You can leave with different equipment and still succeed, but knowing which resource is missing makes the next exploration decision clearer.
When a trap is visible, study it from a safe position and prefer a route around it until you understand its behavior. The starting guide describes probing some triggers with a disposable object; that is not a universal promise that every trap can be neutralized that way. Keep valuable containers and active equipment out of experiments. If a run ends, identify the last manageable problem: an unseen landing, an overloaded bag, a late rest or supplies you could not find. Change that one decision next time. A repeatable first-layer routine gives you a stronger basis for learning deeper hazards than rushing for the ending with the same unresolved preparation problem.
Evidence for this route
| Topic | Status | How this guide uses it |
|---|---|---|
| Mechanics, controls and recipes | 1 source · community wiki | Linked current entries; older guide age warning retained. |
| Kit inventory placement | Official release notes + community item description | Older same-page Usage instruction conflicts; both identified. |
| Full-release layers and characters | Official publisher + community wiki | Eleven underground layers; see layers page for counting scope. |
| Suggested preparation route | Editorial recommendation | Sequence and packing choices explain how to use the cited mechanics. |
Questions
What should I craft first?
The community route starts with a foliage bag: one rope and two canvases. Their listed raw-material chain uses eight foliage.
Why can I not sleep?
Inspect energy, pain, sickness and run settings. The current Energy entry describes a health-panel sleep action with condition restrictions; the sleep section explains them.
Can I drink groundwater?
The current Groundwater entry allows it with sickness and mood costs. Clean water or the documented filter-straw interaction changes that risk.
Related guides
Sources
| Source | Checked |
|---|---|
| Miraheze — Getting started | 2026-11-12 |
| Miraheze — Difficulty | 2026-11-12 |
| Miraheze — Playable characters | 2026-11-12 |
| Miraheze — Emergency light | 2026-11-12 |
| Miraheze — Crafting | 2026-11-12 |
| Miraheze — Encumbrance | 2026-11-12 |
| Miraheze — Groundwater | 2026-11-12 |
| Miraheze — Food & Drink | 2026-11-12 |
| Miraheze — Energy | 2026-11-12 |
| Miraheze — Mood | 2026-11-12 |
| Miraheze — First-Aid Guide | 2026-11-12 |
| Miraheze — Bleeding | 2026-11-12 |
| Miraheze — Infection | 2026-11-12 |
| Miraheze — Life-pod | 2026-11-12 |
| Miraheze — Lock-picking kit | 2026-11-12 |
| Miraheze — Intelligence | 2026-11-12 |
| Miraheze — Layers | 2026-11-12 |
| Steam — official release notes | 2026-11-12 |
| Oro Interactive — full-release overview | 2026-11-12 |